Friday, December 30, 2011

Stationery card

Happy New Memories New Year's Card
Shutterfly always has unique designs for our holiday cards.
View the entire collection of cards.

Saturday, December 17, 2011

Stocking Stuffer Ideas! Sensory products for blind, visually impaired and sighted kids!

Except for a few new holiday shopping commercials this year, everyone knows Santa brings the best presents to open on Christmas morning! But just in case he needs a little help, Sensory Sun is here to help with this list of sensory stocking stuffer ideas we LOVE!


Have some great ideas too? Just share the love by leaving a comment below!

INCHBUG BRAILLE & PRINT ORBIT NAME LABELS:
InchBug.com offers Braille and print name labels for your child's favorite bottles, sippy cups and thermos! They're a cute little 'bracelet' that fits snug around the cup and won't slip off. Pre-printed labels have the child's name in print and braille, but if your child's name isn't already on the list you can purchase a custom label with the name in print and braille text that reads "inchbug". These are great for kids on the go, play dates where there are a million look-alike cups sitting around, and it's not everyday you find your kid's name in braille on a product you don't have to adapt!
CLICK TO SEE THEM HERE


SMENS & SMENCILS:
Make print writing more fun with these holiday scented pencils and pens! These creative scented writing tools are made from 100% recycled newspapers or recycled plastic, and are packaged in corn-based biodegradable plastic that keeps it smelling fresh! Choose from holiday scents like sugarplum, gingerbread, candy cane, cinnamon and holiday cheer. Our favorite is the Holiday 2-Pack where you can try both the smencil and smen for only $5.00! Order from their site soon and you'll still get them in time for Christmas.
CLICK HERE TO VIEW


SENSORY BALLS:
Sassy (R) Development Sensory Balls are great for infants and toddlers. They're small enough for little hands to grasp and provide a variety of great stimulation for blind and visually impaired children, as well as sighted! The set of 3 balls provides focus on three senses with different textures, high contrast visual appeal (great for low vision!), and sound. As your baby grows, they are perfect for encouraging 'drop and find' skills, crawling and throwing.
CLICK HERE TO SEE THIS ITEM ON AMAZON

REUSABLE WATER BOTTLE:
MADILYN'S RECOMMENDATION!
There are a lot of reusable water bottle brands out there, so we're not going to narrow our recommendation down to just one. Reusable water bottles are a great way to show children that their health and our planet's is important! Don't just recycle plastic (mostly petroleum based anyway! yuck!), use a BPA free water bottle time and time again. They have fun colors and prints, varying spouts for about any ability, and comfy little koozies that keep your hands warm and any condensation inside. The most important qualities of a great reusable water bottle are: BPA free, 100% food grade stainless steel material, and spouts that are BPA and phthalate free! Check out brands like Cynergreen, Klean Kanteen, and Sigg. (Registered trademarks not associated with Sensory Sun.)

HO! HO! HO! MERRY CHRISTMAS!
SENSORY SUN BLOG

Friday, December 16, 2011

Oh, Christmas Tree! Touch & Feel Felt Christmas Craft

"Oh, Christmas Tree! Oh, Christmas Tree!"
My husband has asked me over and over again to please stop singing these two short lines of the infamous Christmas carol repeatedly. I guess I should go ahead and learn the song in its entirety...But, I'd rather post this blog instead!


Madilyn and I used our 'Art and Crafts' time on Wednesday to make this pretty little felt Christmas tree. She also learned about triangles and circles, textures, and decorating a tree! It is very simple to do and kids have fun decorating their very own tree they can later hang up in their room.


Materials:
1 Green Felt Sheet
Marker or Pen
Ruler or straight edge
Variety of textured paper, dimensional stickers, foam cutouts, or anything you choose to use as 'decorations'
Brown paper (for tree trunk)
Circle hole punch (or scissors if you must!)
Star cutout for top (optional)
Glue or other adhesive (non-toxic)

Fold the green felt sheet in half and mark the back side lightly where the halfway point is located. Unfold and face back side (marked side) up on your table. Using a ruler, draw a line from the halfway point to the bottom right corner, then do the same going to the left corner. This forms your triangle for the tree cutout. Cut along the lines. Next, cutout as many round ornaments from the textured paper as you would like. Gather any other bits and bobbles (be careful with children under 3 years) to use as lights, garland, and ornaments. You now have the hard part finished! Have your child feel along the edges of the tree, noting how many sides and angles it has. THREE! "What shape has three sides?" A TRIANGLE! Now have her trace her fingers around the circles and any other shapes you're using for decorations. A CIRCLE GOES AROUND AND AROUND. A square has four sides; a star has five points... and so on.


Now for the fun part! Gather all the materials on the work space. Allow the child to pick out which decorations she wants to use, either all at one time or you can pick step by step. Help the child with any parts of this activity that may be too advanced for her. This activity is meant to be fun more than learning proper gluing techniques. [I put the glue dot on the felt where Madilyn wanted to adhere the ornament, then she placed it and pressed it on. Yes, her fingers got pretty sticky but nothing a little soap and water can't fix.]

Glue the ornaments and decorations on the felt tree, attaching the star at the top and trunk at the bottom of course. Then let it dry for a few hours or as long as the glue instructions suggest.


As soon as it's dry (hopefully that day!) bring it back for your child to touch and explore. It will be a great feeling of accomplishment and excitement for her to feel the tree 'all done.' Hang it up on the wall or bulletin board where your child can reach it when she wants. Take turns counting the ornaments, tracing the shapes that make it up, and exploring the different textures. You can even write the name and date on the back for a keepsake to bring out next holiday season.


MERRY CHRISTMAS!
FROM THE SENSORY SUN BLOG

Thursday, December 15, 2011

25 Days of Christmas Advent Boxes

The holiday season is such a fun time of year! It doesn't have to be any different for children with visual impairments. At our house, Madilyn is already up to "Day 15" of this braille box advent calendar. She has already found a sleigh bell, which she DID hear ring and then told me "I believe!" I ordered the braille/print copy of "The Polar Express" by Chris Van Allsburg on Seedlings Braille Books for Children. She also found a little piece of milk chocolate, a soft mint, and a star. She can't wait to see what she finds tomorrow on "Day 16" and I'm just as excited to see her little fingers explore the next box as well!

HOW TO MAKE YOUR OWN BRAILLE BOX ADVENT CALENDAR:

Materials:
25 Box 3D Advent Calendar
Round Crystal Sticker - small (or any raised/dimension circle stickers)
Print Number Stickers *optional
12" Christmas pattern/color cardstock
Paper adhesive
25 prizes to put in each box (candy, bell, small tree ornaments, braille note, etc. Be creative!)
*Find links for these items at the bottom of this post*

The instructions are pretty simple! If you are using the print number stickers, I suggest putting them on first. Then, just adhere the round crystals on each box to create the braille numbers 1-25. Then measure the sides of the box that will show and cut the holiday cardstock to fit. Adhere with paper glue. Let everything dry overnight, or longer if the adhesive directions suggests. Fill the boxes with all the fun and sensory exploring goodies you find to put inside! You could also use the extra crystals to create a message on the top side of the box such as your child's name, "Merry Christmas" or the family name. 

Madilyn opens the day's box every morning after breakfast. It's a fun, spirited way to start out the day and I usually incorporate it into the day's lessons and activities. Happy Holidays!

Braille Box Advent Calendar - The 25 Days of Christmas

**Disclaimer: Please note that the box that should be numbered "17" is missing two dots of the "7" braille number. It must have been damaged in the unorganized Christmas box =( My apologies for not fixing it before I took this picture!**


Resources & Links:
Seedlings Braille Books http://www.seedlings.org/details.php?id=1413&cat=4
Karen Foster 3D Countdown Calendar View on Amazon
Beyond the Page MDF Advent Calendar View on Amazon
Red Crystal Stickers View on Amazon (these aren't the exact item shown in the picture above)

Thursday, December 8, 2011

Inspired by Pinterest - Sensory Christmas Cards for Kids!

So if you haven't been introduced to 'pinning' on Pinterest, then I'm here to make that connection for you. At first you will love me for it, then you will curse me for showing you a way to use up so much of your free time. Then you'll thank me again...

Pinterest is your personal virtual corkboard. You can pin and repin pictures from anywhere on the web, or even from your phone. It is the world of pictures at your fingertips, with shots of everything from DIY crafts to good to pass up recipes to places you may only see in pictures. Check it out yourself, but be willing to be captivated... and by that I mean spend a couple hours or more on there! www.pinterest.com

Since the idea themes are approaching infinity in the Pinterest world, I have decided to narrow down this post to Sensory Christmas Cards for Kids! I 'repin' and 'like' numerous pins I think Madilyn would enjoy AND unlike some people, I actually do a few of these projects! So here I want to share a few with you. Enjoy!

Since this one is my favorite, I'll show it first! We made these cards and used a different finger for each color, with the exception of "Finger 6". It was a great way to relate the numbers of the dots with each numbered finger. Finger 1 makes Dot 1, Finger 2 makes Dot 2, etc... I pretended to be Mr. Elf, the cardmaking elf, while we finished the craft. We used green, red and white string from the scrapbook store for the string and Stickles glitter glue for the metal parts of the lights. Madilyn really enjoyed my funny "Mr. Elf voice" as well as making the cards for her to send out to our family!


Fingerprint Holiday Lights http://pinterest.com/pin/684729801/

Footprint Christmas Tree http://pinterest.com/pin/684729437/

Thumbprint Reindeer Love http://pinterest.com/pin/695766045/

Thursday, December 1, 2011

Coloring Inside the Lines - 5 ways to make coloring fun!

Who says blind children don't need to learn their colors? For a visually impaired child, it may not be at the top of the priority list when it comes to kindergarten readiness, but an awareness of basic colors is bound to come up each day. So how do you incorporate good old coloring into your child's lessons? Easy- scented markers, raised line coloring pages and more! Below are a few ideas to get you started. Feel free to post your own ideas in the comments section, too!

Hints: Keep the paper in place by taping it to the desk or use a clipboard; Try triangle shaped crayons for new artists to learn proper finger placement and grip techniques!


1. RAISED LINES WITH PAINT
Use dimensional paint writers (like TULIP brand Slick Writers) to outline print coloring pages from regular coloring books or print your own from your computer. The paint dries relatively fast, so if you do it in the morning you can color the page by lunch time.

2. FUZZY FELT COLORING PAGES
Fuzzy Felt or Velvet coloring sheets can be found at hobby stores and dollar stores. The linies are raised in that they are outlined with a soft but permanent fuzzy material that fingers can trace to make out the image. Sometimes they are pretty detailed, so take that into account when finding an age appropriate project. Many are on heavy cardstock or even thin cardboard which holds up better for little ones that tend to crinkle or tear construction paper. You can often find these in very large sizes and with markers included in a set.

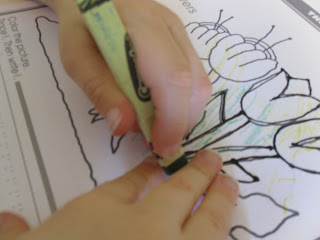
Miss M using one hand to feel the raised paint lines, while coloring with an easy to hold triangle crayon.


3. TEXTURED MATERIAL UNDERNEATH PAPER
For small children new to coloring, the lines may not be needed. Instead, try putting a piece of sandpaper, glitter cardstock, or plastic mesh underneath the paper. Keeping it all in place is easily accomplished by using a clipboard- just be careful with little fingers! The child may then use crayons (glitter crayons make great texture!) to color over the paper thereby receiving feedback from the texture beneath the paper and often creating texture on the paper, depending on the coloring utensil, thickness of paper, how hard the crayon is pressed, etc. Try different combinations to find out what your child enjoys the most!

4. SCENTED MARKERS and CRAYONS
A variety of art companies make scented markers and crayons, including Rose Art, Crayola and Mr. Sketch. You can also label colors on the markers using sticker paper (back adhesive) and your brailler, or contact us for custom labels! Scents can easily link colors to real world characteristics and objects. For instance, yellow is lemon scented, green smells like grass, and purple smells like grapes! You could do an entire sensory lesson using these ideas with foods and things around the home. (Personal note: Scented markers smell much better than the crayons I've experienced, however can be messier.)

5. TALKING/SINGING COMMERCIAL PRODUCTS
Crayola Color Wonder Sound Studio - bring your coloring pages to life with realistic sounds including animals, transportation and even your favorite Pixar characters. Refill pages can be purchased separately or you can use your own regular paper. I used dimensional paints as in idea #1 above to make the Crayola pages raised line drawings, then recorded the sounds as instructed for each page. Each time the child colors over the designated area, she can hear the tiger roar or the car horn beep. The special Crayola mess free markers only color (show up) on the Color Wonder paper, thereby keeping your surroundings (table, chair, child...) clean! There is also the Crayola Beginnings Color Me a Song which makes different music depending on how fast or slow the child colors, and which instrument buttons are pressed. This is great fun for early scribblers!
  • Product Dimensions (inches): 13 (L) x 12 (W) x 2.1 (H)
  • Age: 3 years and up

Crayola Beginnings Tadoodles Markers (Easy Grip) - These easy grip markers are designed for children ages 18 months and up. The design encourages development of gross to fine motor skills. Some of the animal designs make a noise when the caps are replaced, too! For more fine motor help, try the triangular markers and crayons designed to teach proper pincer grasp.


Dora Talking iCrayons - This is an older product I found at Target, but have not been able to find them since then. If you already have it, you can still buy braille and no-braille labeled replacement crayons from Independent Living Aids or on Amazon.

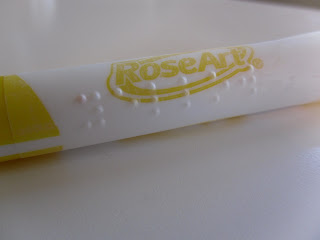
Use adhesive backed sticker paper to make your own braille labels for markers.


**All brands and companies are registered trademarks, along with their products. This blog description is just a personal opinion & recommendation from a parent of a blind child!**
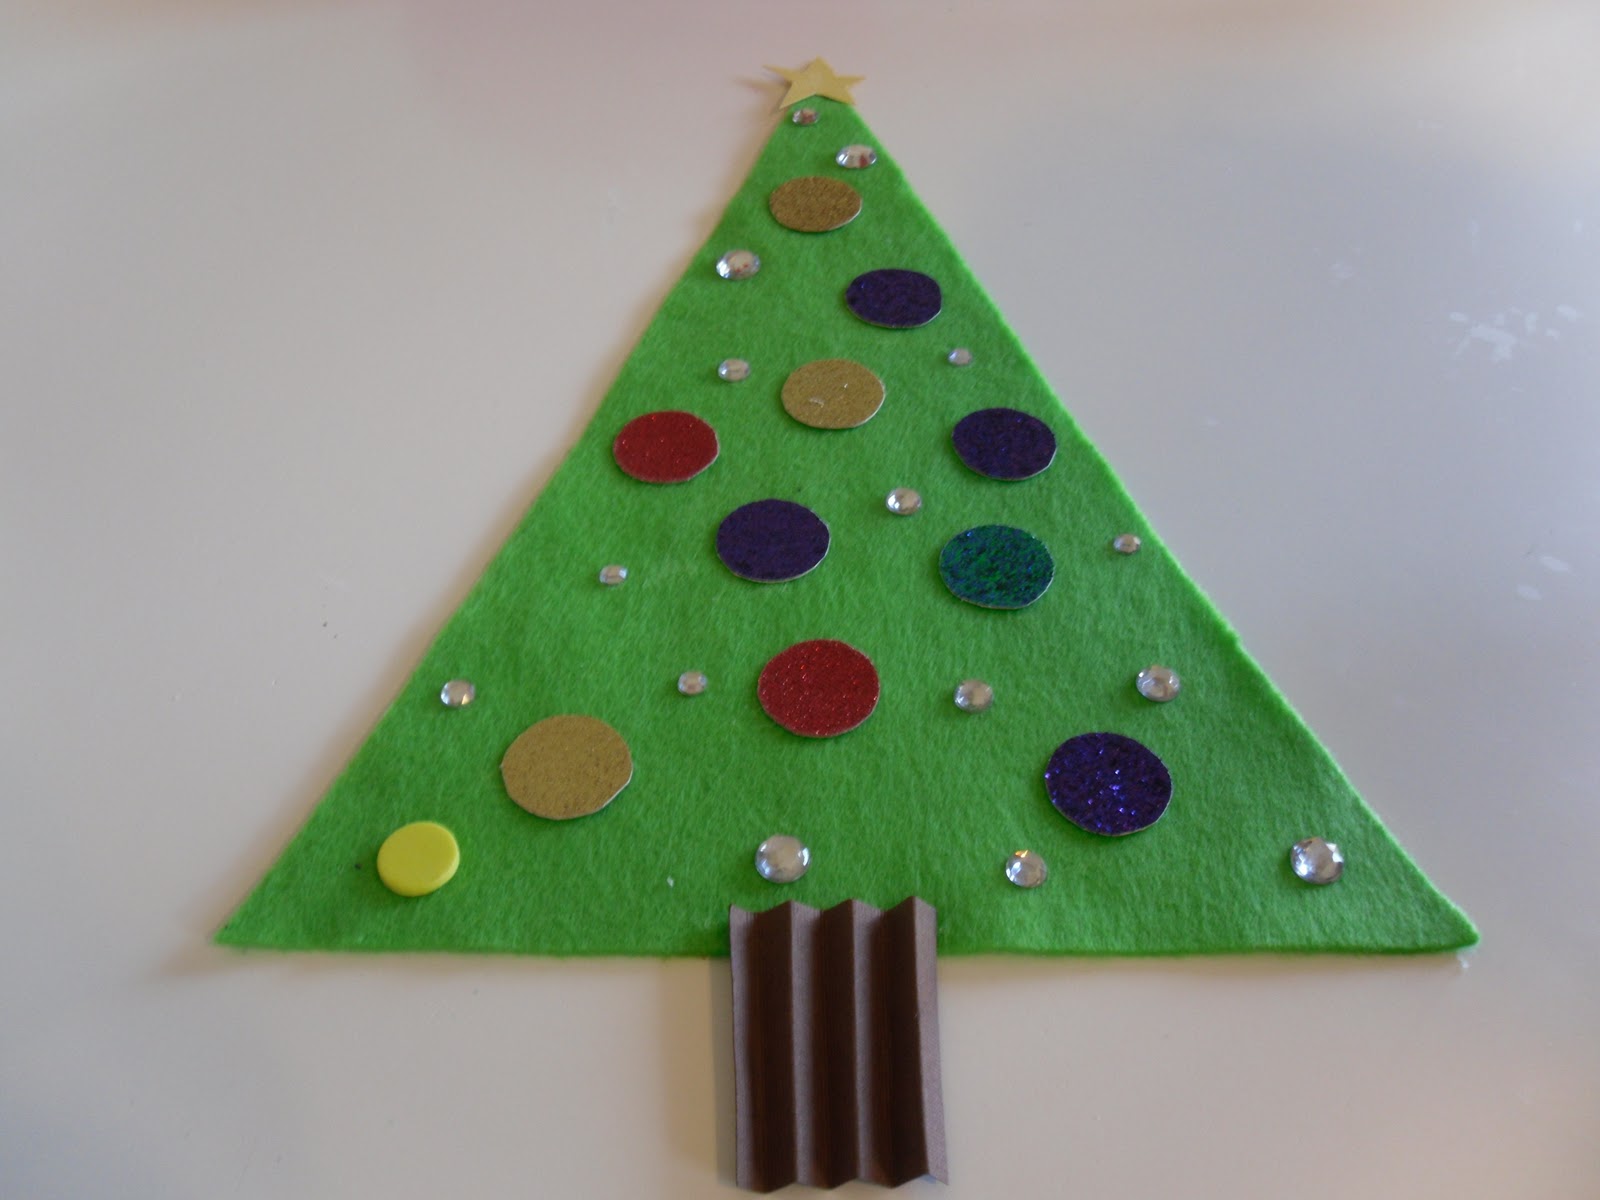